You can create a new object by clicking icons ![]() ,
, ![]() etc. The area into which you insert a new object is highlighted with red interrupted border. By dragging the mouse you can then draw new object. As you drag, the object edges snap to the guides. If you click within the area, a dialog box for entering object position and dimension appears, the position is pre-filled and corresponds to the position of a mouse click. Instead of drawing you may directly double-click the icon to create a new object: a dialog box appears where you can enter the coordinates of the upper left corner and object width and height.
etc. The area into which you insert a new object is highlighted with red interrupted border. By dragging the mouse you can then draw new object. As you drag, the object edges snap to the guides. If you click within the area, a dialog box for entering object position and dimension appears, the position is pre-filled and corresponds to the position of a mouse click. Instead of drawing you may directly double-click the icon to create a new object: a dialog box appears where you can enter the coordinates of the upper left corner and object width and height.
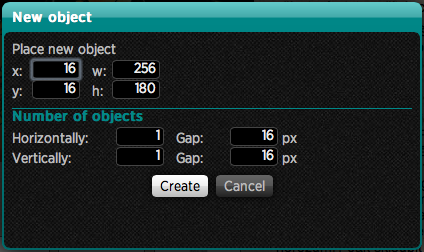
Within the section Number of objects you can specify the repetition: the default setting is the location of a single object, but you may want more objects in horizontal and vertical direction. You may also specify a (Gap), space between objects in every direction.
After clicking the text frame setting it will immediately open and will be ready for text input. If you want to repeatedly work with the whole object, leave the text frame open by clicking outside of it.
If you drag the mouse over any object, its outline will appear. Clicking the mouse will mark the object so you can perform other operations.
Position bar will change and will contain the following values that you can modify:
- upper left corner position x a y
- width and height labeled by letters w a h
- rotation in degrees, enter the full values from -360 to 360
- icons
 for changing of objects order on the page. Above objects the overlap will appear with objects placed beneath. You can also use keyboard shortcut Ctrl + arrow up/down (Windows) or Cmd + arrow up/down (OS X)
 - field Title to enter the object name: if you do not name the object, the name will appear automatically here (type object description in square brackets). You can enter your name after clicking the mouse in the box. This is preferred with variable objects, video and audio, as it is easier to refer to them later when starting On tap operation.
The object position may be naturally changed by dragging the object on the page. Size can be changed so that you drag object handles at the corners and sides.
Using rounded handle above the object you can rotate it.
Hint: If you drag an object while holding down the Shift key, the object will be moved only in a horizontal or vertical direction
Hint: If you resize an object by dragging a handle while holding down the Shift key the aspect ratio will be maintained
Hint: If you rotate an object while holding down the Shift key the angle will be changed only in 15° steps.
Hint: The object position can be changed using the up, down, left and right arrows on your keyboard. The object will move by 1 pixel in either direction. If you hold down the Alt key at the same time, the object will move by 8 pixels.
Hint: If the object is partially covered with another and you need to reach its handles, follow these steps: Select the object you want to edit. Next, press and hold down the Ctrl key and click the object that is interfering with editing – the object moves to the background and becomes transparent. Continue to hold down the Ctrl key and then click on the hidden guide to make adjustments. When you release the Ctrl key, the object that was moved to the background temporarily will return to its original position.
With the Design bar you may adjust the object appearance:
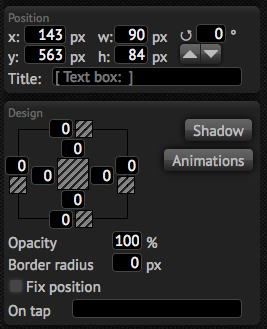
- the central colored box determines and sets the background color
- surrounding color fields, specify the color of corresponding edge (you may set the color for each edge separately: top, bottom, left and right)
- numeric field on the edge line sets the width of corresponding edge (again, you can set different width for other edges)
- numeric field between the central field and margin settings sets the inner indentation of the object in relevant direction (for example, the text can be indented to different values of the left, right, top or bottom within the frame)
- Set shadow – displays the dialog for entering the object shadow: if the shift within the direction of x and y is entered, then the blur values and color of shadow are adjusted.
- Opacity – determines the overall density of objects, enter a percentage from 0 to 100
- Border radius – determines the curvature of edges
- Fix position – if checked, then the object does not change position when scrolling the article. See article Special advertising
- On tap – determines what action will be performed after the reader taps on object with finger. Refer to On Tap action.
Hint: to enter values between fields (size, margin width, internal indentation etc.) can be changed quickly with keys Tab and Shift + TAB
If any object is selected, than it is present in the Functions group on functions bar. This allows you to do the following:
-
To Copy or Move the object with the
 button – it opens a dialog box where in the first column you can enter the issue and in the second column the article of this issue into which you want to copy or transfer the object. If the article has multiple pages, you may want to choose the third column. Action is done by clicking the Copy or Move button.
- If you copy or move your object within the same article, the action will take place on your computer and will not appear until you save article.
- when copying an object to another article, then it appears immediately in the target article regardless of whether you save any changes in the original article. The action occurs immediately, you will be notified about this action.
- If you transfer the object to another article, its copy will be created immediately in the target article and will also be subsequently deleted from original article on your computer. This deletion will not be reflected until you save the article – i.e. you can prevent the deletion when you exit the article saving.
- A group of objects can be also copied/transferred. If there are not matching styles and colors in the target article, they will be created. If there are already matching styles or colors with same names the target values will be used (for example, text can be reformated according to the target style).
- When doing copying and transferring, the source files are also copied (images, video, etc.). Sources of the original article are never removed (remember to remove them if they are no longer needed) – read the chapter 17 Using sources from other articles
-
Duplicate
 button – creates a copy of selected object and retains all its properties
 -
Delete
 button – deletes object. The operation cannot be reversed. You may also use the keyboard shortcuts Ctrl + Delete (Windows) or Cmd + Delete (OS X) or consequently Ctrl + Backspace (or Cmd + Backspace)
Hint: All numerical values that you enter to Triobo (position, size, font size, …) can be changed not only by entering a value, but also by using the up and down arrows – in such case, the value is changed by 1 unit. If you hold down the Alt key, then the value is changed by 8 units.